If you take photographs and you edit them on a desktop PC or laptop then you are probably well aware of, or should at least have heard about, this business of calibrating your computer screen. Calibrating your computer screen is the important first stage of a color managed workflow. You can edit your images, print them (on your profiled printer/paper), send them off for printing elsewhere or share them in some other way safe in the knowledge that your images will look very similar when reproduced or displayed by someone else – provided, of course, their printer or screen is properly calibrated. If what I have just said makes no sense to you, or you want some more info, then take a look at this Overview of Colour Management.
There are three main factors to calibrating your computer screen
- Colour calibration: making sure the screen is correctly adjusted to display colours as accurately as possible (this is a broad area and covers several settings that I’m not going to go into)
- The luminance (brightness) of the screen
- The brightness of the ambient light in the room and falling on to the screen (the colour temperature of the light is important too, especially so if you are viewing prints)
This is all very well when you use your computer at the same location and you have control over your environment but what do you do when you have an iPad, it’s a mobile device and could be used anywhere. What can you do to set the screen up to give you predictable results?
What you can’t do
Well lets start with what you can’t do: you cannot control the colour. Due to the fact that Apple lock the iPad down, and there is no access to the system, there is no way to change how the iPad renders colours for all applications. There is an image viewing app that allows you to use a Spider to calibrate the iPad screen but the colours are only corrected for that appication. Fortunately though the iPad already renders colours pretty accurately anyway so this is something we do not really need to worry about too much.
Here are the things you can do
- Disable Auto-Brightness
- Choose your location
- Set a specific brightness
- Use a reference image
Disable Auto-Brightness
The iPad has a great feature that automatically adjusts the brightness of the screen according to the ambient brightness at your location. It is on by default. When you are sat by the window or some other bright location the screen brightness increases to compensate, and vice-versa. This works really well but is not good for image editing when need some consistency so turn the feature off. Go to Settings > Brightness & Wallpaper and flick the slider.
Choose your location
The brightness of the ambient light where you are using your iPad makes a huge difference to the way the screen looks. If you are in a bright location the screen will look dim and the colours washed out no matter how high you turn the brightness up. Similarly if you are in a very dark place the screen is going to look very bright indeed, and even hurt your eyes – if you have every used your iPad in the dark with the lights out you will know what I mean! – it is not possible to turn the brightness down very far. So it comes as no surprise to be somewhere not too bright and not too dark and don’t have sunlight falling across the screen.
Set a specific brightness
The next thing is to set a suitable brightness manually so while you are in the Brightness & Wallpaper setting you can adjust the slider to set the brightness you need.. but how bright or dim should it be? You need to use a familiar image as a reference.
Use a reference image
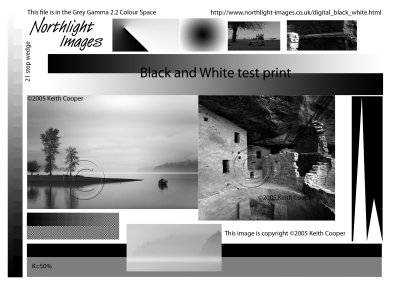
There are several things you can do here. Use an image that you are really familiar with and know what it should look like on the screen. If you process images on a PC then you will likely have such an image. It should have some bright areas and some shadow areas so that you are able to tell if it looks correct. Perhaps the preferred method, and the one that I employ, is to use a test image.
This is the image I use to adjust the brightness of my iPad screen for image editing or viewing. Download the image from Keith Cooper’s website, Northlight Images. Load it up into your Photos app via iTunes or into some other app like GoodReader. Thanks to Keith Cooper for making this image available on his website, I use it all the time for testing printer setting and new papers.
Once you have the image displayed on your iPad screen you can now double press the Home button to pop-up the application switcher. Slide the switcher to the right to reveal the brightness control. Whilst this has pushed the image slightly off the top of the screen the all important darker areas of the 21 step wedge down the left had side are visible. Now all you need to do is adjust the brightness so that you can just about see the boundary between the two darkest areas.
And that’s it, you should now have your iPad brightness set up correclty. Be prepared to follow this process all the time as the light changes and when you find yourself editing images on the move.

Why use a photo downloaded from the web?
Wouldn’t it be better to take a picture with the ipad of exactly where you are, and then get the ipad image to match the reality that you are looking at?
MF